新的一年有機會在公司內部接觸一些些後端語言,公司的後端是 ASP.Net,所以開啟了 C# 學習之路
最最初階的學習資源,目前是來自:
dotnetcademy
適用於初學者的 C# 基礎知識
宣告變數,需指定其類型並提供名稱
C# 是 強型別語言 (Strongly Typed Language),這表示每個變數 (Variable) 或常數 (Constant) 在使用之前都必須先明確定義其型別 (Type)。
1 | string greeting; |
新的一年有機會在公司內部接觸一些些後端語言,公司的後端是 ASP.Net,所以開啟了 C# 學習之路
最最初階的學習資源,目前是來自:
dotnetcademy
適用於初學者的 C# 基礎知識
C# 是 強型別語言 (Strongly Typed Language),這表示每個變數 (Variable) 或常數 (Constant) 在使用之前都必須先明確定義其型別 (Type)。
1 | string greeting; |
Write a class that allows getting and setting key-value pairs, however a time until expiration is associated with each key.
The class has three public methods:
set(key, value, duration): accepts an integer key, an integer value, and a duration in milliseconds. Once the duration has elapsed, the key should be inaccessible. The method should return true if the same un-expired key already exists and false otherwise. Both the value and duration should be overwritten if the key already exists.
get(key): if an un-expired key exists, it should return the associated value. Otherwise it should return -1.
count(): returns the count of un-expired keys.
set(key, value, duration): 接受一個整數的 key、一個整數值 value,以及一個毫秒為單位的時間 duration。當持續時間結束後,這個鍵值對將不能被存取。如果相同且未過期的鍵存在,則回傳 true,若不存在則回傳 false。如果這個鍵已經存在,其值與持續時間都應該被新傳入的 value 與 duration 覆寫。get(key):如果存在未過期的鍵,回傳其對應的值。若沒有相對應的鍵,則回傳 -1。count():回傳現存未過期的鍵的總數量。
CSS Scroll Snap 是一種用於控制滾動行為的 CSS 模組,允許開發者在使用者停止滾動時,自動將視圖對齊到特定的元素。這種功能常用於創造更流暢的用戶體驗,例如分頁文章、圖片輪播等。
scroll-snap-type:設置在滾動容器(父元素)上,用於定義滾動軸向和滾動對齊的行為。
格式為:scroll-snap-type: [軸向] [行為]
軸向可以是 x(水平滾動)、y(垂直滾動)或 both(同時支持水平與垂直)。
行為可以是 mandatory 或 proximity:
mandatory:滾動必須對齊到指定位置,確保每次停下來都會對齊。
proximity:當滾動接近某個指定的位置時,會進行對齊。
例如:
1 | .scroll-container { |
scroll-snap-align:設置在滾動內容項目(子元素)上,定義這些元素在滾動容器中的對齊方式。
可選的值有 start、center、end,決定項目在滾動結束時如何與容器對齊。
例如:
1 | .scroll-item { |
| 屬性 | 描述 |
|---|---|
scroll-snap-type |
定義滾動容器的捕捉行為,包括方向(x, y, both)和強制程度(mandatory, proximity)。 |
scroll-padding |
設置容器內邊距,影響捕捉點的位置。 |
scroll-snap-align |
定義子元素在容器中的對齊方式(start, center, end)。 |
scroll-snap-stop |
控制是否在特定元素上停留,默認情況下僅在停止滾動時觸發。 |
1 | .scroll-container { |
使用 @supports 進行功能檢測:你可以使用 @supports 檢測瀏覽器是否支持 Scroll Snap,並提供相應的回退方案。例如,如果某些瀏覽器不支持,則可以使用 JavaScript 實現類似的行為。
1 |
|
1 | 複製程式碼 |
當頁面內容繁多,或包含大量動畫和捕捉點時,可能會導致性能問題。這會導致滾動卡頓,特別是在移動設備上。
解決方案:
避免過度使用捕捉點:不要對每一個小元素都設置 scroll-snap-align,僅在核心內容(如頁面段落、關鍵節點)設置捕捉點。例如,圖片輪播或長段落之間可以有捕捉點,但不需要對每個小項目設置。
除此之外,可以嘗試 lazy load:對於圖片或大型內容,使用懶加載技術(如 Intersection Observer API)可以避免一次性渲染過多內容,從而減輕滾動過程中的性能負擔。
1 | const images = document.querySelectorAll('.lazy-load'); |
1 | let isScrolling; |
參考文章:
超好用的 Web API - Intersection Observer
No JS required — you can do this with CSS!

在 Quasar 的日期選擇器,要使用 QInput + QDate 方式,可以參考文件 Date Picker。
但在此次功能需求,是讓使用者只能選擇年/月。所以首先依循查詢結果,找到 monthpicker ,在其中 codepen - QDate: DATE YEAR/MONTH PICKER,透過設置 setView 屬性,使得選擇器界面可以顯示年、月以及日的選擇視圖。
因此參考上方的方式,建立一個 monthlyPicker 元件。
1 | <template> |
1 | <script setup lang="ts"> |
1 | <template> |
在前端開發中,有時需要從後端提供數據並生成文件提供用戶下載。以下將以下載 Excel 為例,介绍如何使用 axios 從後端取得文件,並在前端處理文件的下載過程。我们還會顯示如何從 HTTP header 中提取文件名,以 f 確保下載的文件命名正確。
要記得設置告诉 axios 期望接收的類型為 blob,若是不設置,則會預設為 json,收到的資料會是亂碼。
1 |
|
獲取到後端返回的文件數據後,我們需要在前端將其轉換為可下載的文件格式。以下是一個完整的示例,展示瞭如何將 blob 數據生成 Excel 文件並觸發下載。
1 | const handleExportFile = async () => { |
這里,用 new Blob() 創建了一個 Blob 對象。
res.data 是從後端 API 接收到的文件數據。
我們將這個數據放入 Blob 中,同時指定了文件的類型,即 application/vnd.openxmlformats-officedocument.spreadsheetml.sheet,這是 Excel 文件的 MIME 類型。這樣瀏覽器就能識別出這是一個 Excel 文件。
<a> 標簽,並通過模擬點擊觸發文件下載。使用 window.URL.createObjectURL(blob) 創建了一個特殊的 URL,它指向我們剛才創建的 Blob 對象。
可以理解為它生成了一個臨時的下載地址,使用者可以透過這個地址下載文件。
接著 document.createElement(“a”) 創建 <a> 標籤,接下來要利用這個標籤來實現文件下載。
也就是 link.href = downloadUrl; 給 <a> 標籤賦值,將剛才生成的 downloadUrl 設定為這個 <a> 標籤的 link 地址 (href),也就是說,點擊這個 link 會指向我們的 Blob 物件(即文件資料)。
使用 setAttribute 方法給<a> 標籤添加一個 download 屬性,並設定文件名為 “export.xlsx”。這樣,當用戶點擊鏈接時,瀏覽器會提示下載文件,並自動將文件保存為 export.xlsx。
document.body.appendChild 將 <a> 標籤臨時加到 document 的 body 中。雖然使用者不會看到這個 link,但它在頁面上是存在的。
然後模擬一次使用者點擊這個連結 (link.click()),觸發文件的下載過程。
link.remove();下載操作完成後,我們把這個臨時創建的 <a> 標籤從頁面中移除。
在現代網頁應用中,強大的文字編輯器是必不可少的。Tiptap 是一款基於 ProseMirror 的高擴展性編輯器。本文將介紹如何在 Vue3 中使用 Tiptap,並結合 Vuetify 實現文字編輯器。
首先官網:https://tiptap.dev/docs/editor/getting-started/install/vue3
1 | <template> |
根據對應 EXTENSIONS 找出如何加入在編輯器,如:bold, italic
1 | <button @click="editor.chain().focus().toggleBold().run()" :class="{ 'is-active': editor.isActive('bold') }"> |
最近嘗試在專案內加入測試,詢問朋友後建議先從 utils 中共用的邏輯函式開始,而在共用的邏輯函式中,會有幾個是 i18n 相關的函式。
因為頁面中常會用到將數值,轉換為顯示在畫面上的文字,如下:
1 | const getType = (type: number) => { |
在進行測試時,總想說是否要先選定一語系,如中文\英文,然後確認他轉換的是否為該文字
但是經過嘗試後,覺得或許不應該是檢查轉換後的文字,應該要以對應 key 來檢查。
參考 overflow
1 |
|
使用全局模擬,vi.mock 全局模擬 i18n.t 方法,並提供模擬的 t 函式,這樣就可以在測試中,直接檢查是否回傳對應的 key,而不用檢查轉換後的文字。
另外,在跨頁面也會有共用的下拉選單,將此下拉選單的選項,也提取出來,並進行測試。
1 |
|
原本也想是否直接檢查 key 是否正確即可。但基於困惑,就嘗試丟 chatGpt 詢問
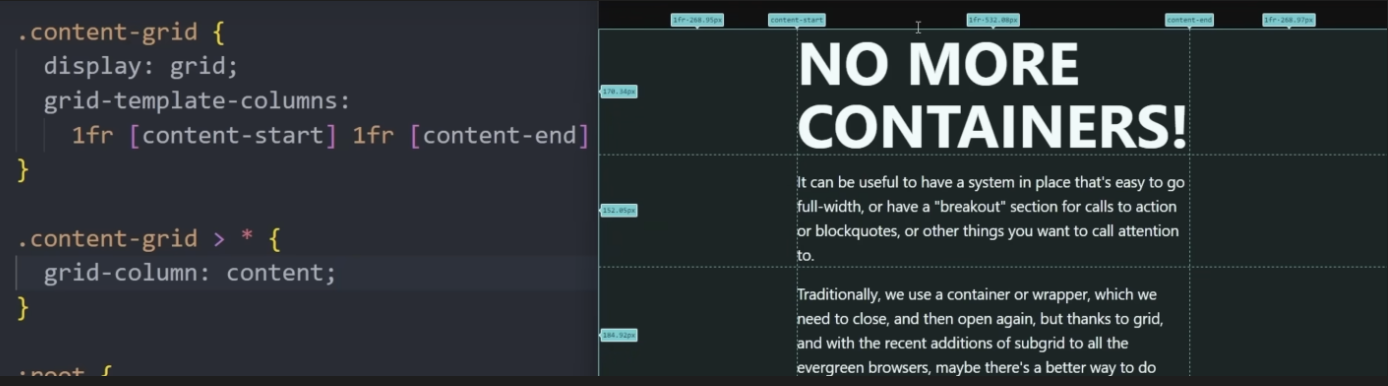
在 Youtube 看到 Kevin Powell 介紹使用 grid 來作為 wrapper,以自適應網頁的縮放。
首先基本常用 grid 方式
1 | .content-grid { |
加入使用 using named grid lines,定義出欄的 content 範圍
1 | .content-grid { |
設計一個 class 給他,如果在 content-grid 以下的元素,會將以下的元素放在 content 之間
.content-grid 內部的每一個直接子元素1 | .content-grid { |
因工作需求需要製作簽名面板,查看套件使用度較高 signature_pad
npm i signature_padinitializeSignaturePad : 進行初始化,如尺寸大小、筆的顏色、畫布背景色等。這邊將這些設置放在 props 讓使用時可以保有一些彈性空間。
resizeCanvas : 用於調整畫布的大小,目的是確保畫布的大小能夠適應不同的設備和螢幕解析度。
saveSignature\ clearSignature: 顧名思義就是儲存、清除簽名
注意:因為將簽名功能包成元件,使用 emit 將儲存的簽名傳到外層。
1 | <template> |